Onboarding
This book is not for the general public. If you are not employed at a company that has the name United Ads Ltd and the address Palliser House 2nd Fl, Palliser Road, London W14 9EB, delete this book from your device and close the browser tab immediately.
First of all, welcome to the company!
Its probably best if you bookmark the links directory in your browser, for quick access to everything related to the company.
If you are a technical person, you are likely to be interested in these:
Я не понимаю. Есть версия на русском?
Используйте функцию автоперевода в браузере. Вроде бы в яндекс браузере есть очень хороший автоперевод.
Документация написана на английском потому что в ней исползьуется очень много технических терминов и жаргона на английском которые автор не знает как перевести на русский.
Links
Admin panels:
Task trackers:
Version control:
Package registries:
Documentation
This chapter covers this website.
To get started, select what you would like to start with:
Editing the book
To edit the book, you will first need to have your github set up.
The book's repository is located at https://github.com/United-Ads-Ltd/docs. Clone that and add your changes as per the guide on how to add changes to a repository:
$ git clone git@github.com:United-Ads-Ltd/docs
The book is created using mdBook. View mdBook's documentation.
Managing access
The book's main domain is controlled by cloudflare access settings.
To add a new user, you will need to edit this policy.
Servers
This directory lists all servers operated by the company.
Use the navigation menu to select a server.
Central
| Name | Value |
|---|---|
| IP | 157.230.94.45 |
| SSH port | 22 |
Important: Due to redis saving settings, it is very much possible that during a power off, an affise postback may be sent twice. For this reason, it is recommended to first disable network for the server for 30 seconds before powering off.
This server is being deprecated, so this means that no new websites or services can be hosted here.
Everything that was deployed on this server was deployed prior to June 2025. Everything after that date is deployed on either the Payments and Admin servers.
Mysql database
This database contains all of our data, and is mostly used by playallday.online and mids based off bullere.com.
The port is 3306, but is closed off to WAN.
Even though this database was mostly migrated to the one managed by DigitalOcean, it still remains operational for old services on this server that were not migrated.
Redis database
The redis server has been configured to save every 15 seconds if at least 1 key has been changed, and every 10 seconds if at least 10 keys has been changed.
The port is default, but is closed off to WAN.
Payments
| Name | Value |
|---|---|
| IP | 164.92.125.227 |
| SSH port | 22 |
Note: This server may be sometimes referred to as
dockerordebian-database
This server hosts only services related to processing payments, that were deployed after June 2025:
- Unified payment backend
- Dreamwardrobe-based mids
This server must have at most 2 hours of downtime per year (Tier 3), and host only the services most necessary to processing payments.
This server is set up following the Common Docker Setup Guidelines
Admin
| Name | Value |
|---|---|
| IP | 143.198.104.172 |
| SSH port | 22 |
This server hosts all services not strictly related to payment processing, that were deployed after June 2025, most notably the Admin Panel
Unlike payments, this server has no requirements for uptime per year.
This server is set up following the Common Docker Setup Guidelines
Database
| Name | Value |
|---|---|
| Host | db-mysql-sfo3-62088-do-user-8273593-0.f.db.ondigitalocean.com |
| Mysql port | 25060 |
This server is managed by DigitalOcean.
For up-to-date information, refer to the page on the digitalocean dashboard
Common Docker setup guidelines
These guidelines are fit for setting up a simple docker-compose orchestrated system.
1. Required software
The server must have the docker systemd service, which must be enabled.
The docker engine must be of the latest version that the package repository provides.
There must be a docker compose plugin installed with a version of at least 2.20
2. Users
There must be a ci user, regardless if any CI pipelines are actually set up.
This user must also have the git credentials set up.
3. Docker compose directory placement
All services must be placed in the /opt/cont directory, with each service having the following directory: /opt/cont/%s/, where %s is a service name.
In addition, they may be grouped like this: /opt/cont/%s/%s/, where the first %s is the name of the group, and the second %s is a name of a service inside the group.
/opt/cont must be owned by ci:ci, as well as all of its chlidren. It is permissible that inside a service some files may be owned by root:root due to container limitations.
3.1. Docker image files placement
Custom per-server images must be placed in the /opt/image directory, with its first-level subdirectories being named as it is with the services.
/opt/cont must be owned by ci:ci, as well as all of its chlidren, with no exceptions, unlike the service directories.
4. Updating code from Git
You must run all git commands as the ci user:
sudo -uci git pull
sudo -uci git clone ...
4.1. Comitting code to git
In rare cases, it may be necessary to do some changes on the server. When that happens, you should set up your git name and email on your personal administrator account and temporarily reassign the ownership to yourself for just enough time to make the commit:
git config --global user.name ...
git config --global user.email ...
sudo chmod -R "$(id -u):$(id -g)" .
git add file1 file2 ... fileN
git commit -m "change stuff"
sudo chmod -R ci:ci .
And if you want to push these changes, you will have to run the git push command as the ci user, and do not set up git credentials for your own user.
Postbacks
Affise postbacks are sent through mid.com/konnektive/success.php and konnektive callback on tellermail.com/konnektive/callback.php.
The actual code that sends the postback is in mid.com/classes/NewPostback.php.
Postback URL
The system sends a postback to this URL with no authorization:
https://offers-uniads.affise.com/postback?clickid={transaction.custom2}&sum={transaction.totalAmount}&action_id={transaction.merchantTxnId ?? transaction.id}&goal=1&status=1
Decomposing the GET parameters as json-ish markup:
{
    "clickid": transaction.custom2,
    "sum": transaction.totalAmount,
    "action_id": transaction.merchantTxnId ?? transaction.id,
    "goal": 1,
    "status": 1
}
You can see from this that there are only 2 constants, and all the others are pulled from the transaction.
I should also clarify that while the JSON structure above shows some typing, all of those are actually strings.
Databases
There is 2 data sources involved in the postback system:
- Redis cache on the central server
- Konnektive-supplied data, mostly from webhooks and callbacked customers
Inner workflow
This workflow is applicable to both success.php and callback.php.
1. Seen list
When the system accepts a transaction, it first checks if the transaction has been seen before by the system. If it has been, it will ignore the transaction.
The transaction seen list is stored in the redis cache with the key postbacked-transactions.
Since redis saves every 15 seconds after an update, it is possible that a postback may be sent twice during a power off. For this reason, it is recommended to turn off the network for the server for 30 seconds before the power off.
2. Per-offer skip rule
There is a rule that can be set that the system may not send every Nth postback per offer. This is more detailed in the skip some transactions section.
If the rule decides that the postback should be skipped and the transaction is processed via success.php, the user will be redirected back to the offer with parameter ?pixel=null.
Total schematic
- The user is completed a purchase and is redirected to
success.php - The user loads the
success.phppage During the time thatsuccess.phploads, the workflow is executed:-
This transaction was not seen before
-
Log the transaction as seen
Important: This will be actually written to disk in only 15 seconds
-
Ask the per-offer skip rule if skip
- If skipped, there will be an additional
?pixel=nullon the redirect out of the page
- If skipped, there will be an additional
-
If not skipped, the postback will be sent. The data supplied by konnektive to the user will be used to fill out the postback URL
Important: There is a security concern since the data is actually passed on to the user, and the user passes that data on to us. Therefore, we trust whatever the user gives us, which is not secure by any means.
-
- If the user did not reach
success.php, konnektive will report the transaction tocallback.phpin 5-10 minutes after the fact, and similar processing will take place with the one exception that there will be no?pixel=nullappended to the redirect out of the page.
How to: Skip some transactions
It is possible to configure the postback system to skip every N transaction of either a specific offer, or globally.
This can be configured either in the postback_conf table on mysql database on central, or in the legacy admin panel on section "Postback configuration".
This mechanic is implemented in the mid.com/konnektive/skipPostback.php file.
Configuration
To create a rule for all offers (a global rule), use null as the offer id.
To create a rule for one specific offer, use the offer id as the offer id. This rule takes precedence over the global rule.
Rule precedence
When a transaction is being processed, the mechanic fetches 2 rules: the global rule and the offer-specific rule.
The rule applied is selected with this logic:
- If there is an offer-specific rule, it will be used.
- If there is no offer-specific rule, the global rule will be used.
- If there is no offer-specific rule and no global rule, the mechanic will disable itself for this one transaction. Meaning the transaction will not be skipped by this mechanic.
- If both rules exist, offer-specific rule will be used.
Github
This chapter covers github access.
Our github organization URL is https://github.com/United-Ads-Ltd.
Select a chapter from the sidebar to continue. If you are new here, select Getting access
Getting access
First, make a github account if you have not already.
Then, send the email you used for your github account to the employee who is in charge of onboarding so that they send you an invite to the organization.
The invite will be in the github notifications and in your email inbox.
Cloning a repository
To clone a repository, you will first need to have your SSH keys set up.
After doing that, use your terminal to clone a repository:
$ git clone git@github.com:United-Ads-Ltd/some-repo-name.git
Its always good practice to have a special SSH key for your github. This can be achieved with a config like this:
$ cat ~/.ssh/config
Host github.com
    User git
    IdentityFile ~/.ssh/id_git
	IdentitiesOnly yes
$ cat ~/.ssh/id_git
-----BEGIN OPENSSH PRIVATE KEY-----
...
-----END OPENSSH PRIVATE KEY-----
Adding changes to a repository
Important
This is a very basic guide on how to work with git. For more advanced information on how
gitcommands work, you will need to look it up on the internet on your own.
To add changes, you need to first create a branch for your changes.
The name must describe what you are aboout to do and be ^[a-z\-]$
For example, for a branch that adds a new button:
$ git checkout -b new-button
After making a change to a file, add a commit:
$ git add path/to/file
$ git commit -m 'describe your changes'
You can have more than 1 file in a commit:
$ git add path/to/file
$ git add path/to/file2
...

$ git add path/to/fileN
$ git commit -m 'describe your changes'
And push after creating a commit:
$ git push -u origin branch-name
After you think you are ready to get your work reviewed, create a Pull Request.
Creating a Pull Request
To create a pull request, you first need to add changes to the repository.
After pushing, you will likely see a message of the following sort:
remote:
remote: Create a pull request for 'new-branch' on GitHub by visiting:
remote:      https://github.com/United-Ads-Ltd/repo/pull/new/new-branch
remote:
Also, when opening the repository, github will likely suggest that you create a pull request:

When writing the description & title, make sure to follow these rules:
- For the title, be as concise and clear as possible about what your PR achieves
- For the description:
- Make sure to say what you want the PR to achieve and how you did it, but not too broad, a few sentences will be enough.
- If you have any concerns, you need to list them in the description
- Attach a closing keyword for an issue, if relevant.
- In the assignees section on the right, assign yourself to the issue
After you are done, create either a normal or draft pull request:
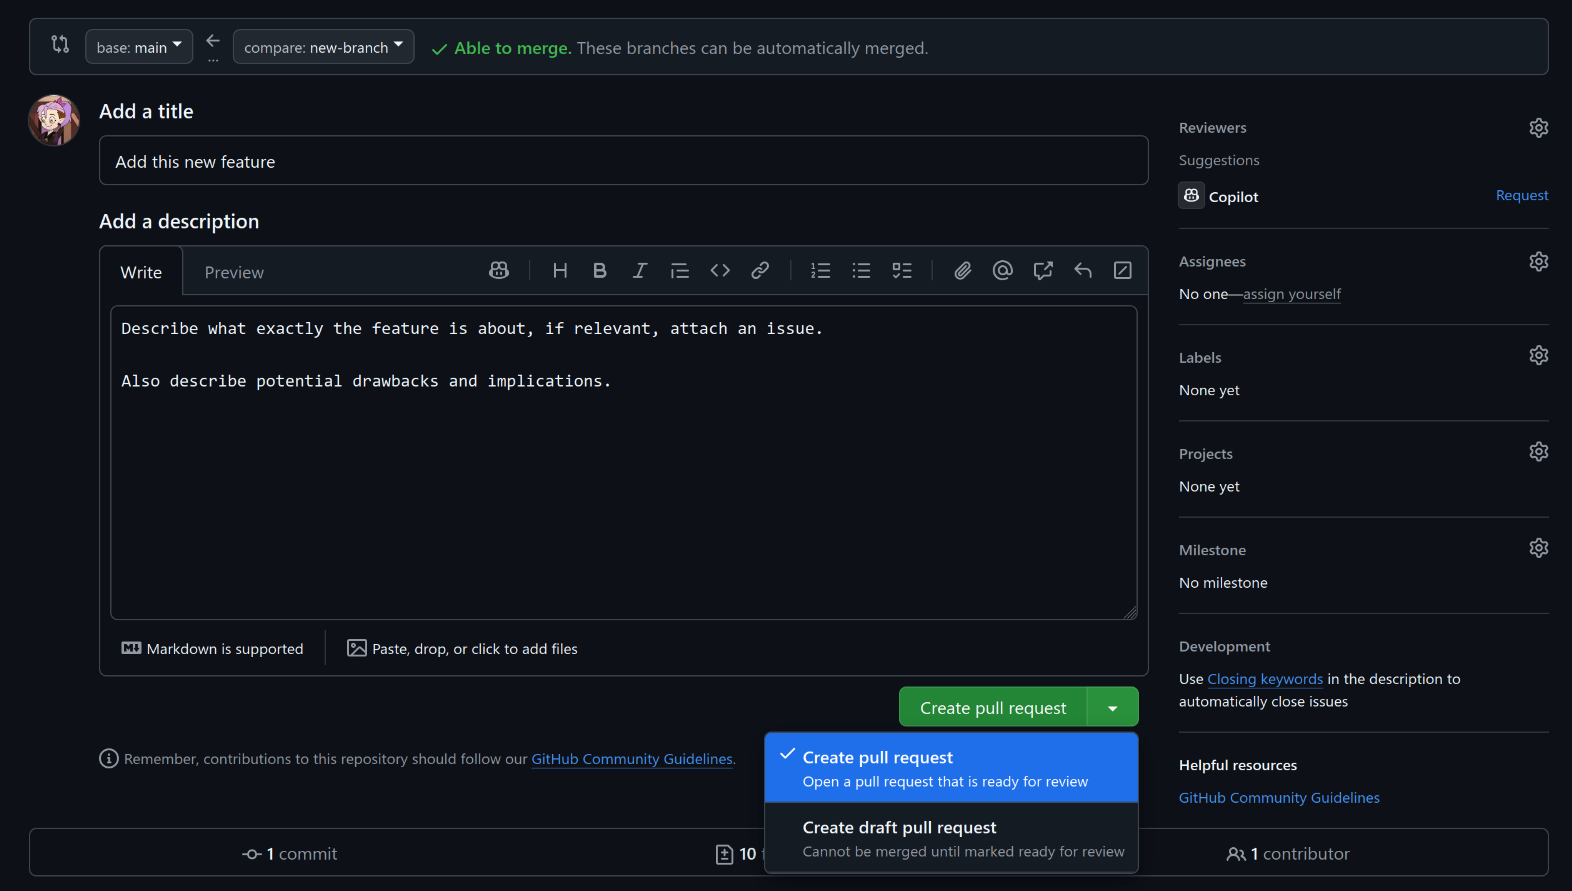
A draft pull request is something you are currently working on and you wouldn't merge that to master right away.
To get someone to review your work, click on the "Reviewers" section on the top left and select their name. Github will usually suggest you a bunch of people.
Admin panel
The admin panel is available on this domain: admin.uniadstech.com.
Its source code is hosted on github.
User's guide
Creating an account and setting permissions
To create an account, you will need sudo access to the admin server.
In the admin server, in /opt/cont/admin directory, execute the following:
sudo docker compose exec php php artisan make:filament-user
Then, it will ask for user details in a nice form through which you can create the user.
For the permissions, it is a bit tricky since at the time of writing the person who created the panel didn't have enough time to make it easy for you. So you will have to either edit them in the database manually or use the artisan tinker command to use Laravel's ORM, which will go something like this:
/opt/cont/admin $ sudo docker compose exec php php artisan tinker
[sudo] password for x:
Psy Shell v0.12.8 (PHP 8.4.1 — cli) by Justin Hileman
> use App\Models\User;
> $user = User::where('email', '=', '...')->first();
= App\Models\User {#7204
    id: ...,
    name: "...",
    email: "...",
    email_verified_at: null,
    #password: "...",
    #must_change_password: 0,
    admin_access: "[]",
    is_readonly: 1,
    #remember_token: "...",
    created_at: "...",
    updated_at: "...",
  }

> $user->admin_access = '"*"';
= ""*""

> $user->save();
= true

> ^D


   INFO  Ctrl+D.

/opt/cont/admin $
If the admin_access is set to "'*'", the user will have access to everything in the panel.
If you want to have a more fine-grained access, set the admin_access like this:
> $user->admin_access = json_encode([ App\Filament\Pages\Mids::class ]);
For the exact list of the pages you can set, view them in the source code.
Logging in
If you have opened the https://admin.uniadstech.com link in your browser, you will see nothing. To get access to the admin panel, you need the https://admin.uniadstech.com/admin. The one ending in /admin.
If you have created a user, but it tells you the credentials are invalid, you have probably skipped the last part where you need to edit the database. Or its possible that you simply got the wrong password.